
Developed from customer input, B9Creations’ casting process and resins have earned the trust of casting houses and jewelers across the globe – used by customers like Master Casting and CAD, Riddle’s Jewelry, and The Casting House.
Explore this guide to learn how our customers are getting flawless casting results with jewelry pieces 3D printed on the B9 Core Series.
Design, Support, & 3D Print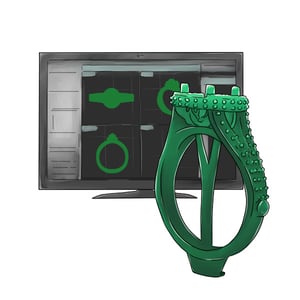
It’s time to get started! First, use your preferred CAD software to bring your ideas to life.
Using 3D print preparation software, like B9Create, supports are added to a design to ensure sections are printed properly. For successful prints, supports hold up overhangs as well as make sure the print is adhered to the build table. Prints require supports under large surface areas that can be prone to suction or sinking. Each added support requires manual removal to reveal the printed object – the less supports you add, the less time consuming post-processing will be.
Now that your model is designed and properly supported, you’re ready to start printing! Accelerate your production process, without sacrificing print resolution and surface quality, using the B9 Core Series – capable of printing an entire build table of rings in just one hour.
Support Removal & Post-Curing
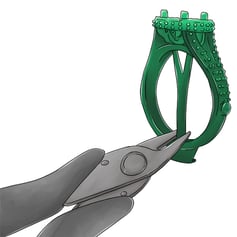 Supports can be removed prior to the curing stage. During this time, the print is softer and easier to manipulate – supports can easily and smoothly be removed with a pair of clippers or tweezers.
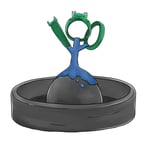
Curing 3D printed models is achieved through methods using varying combinations of light and heat.
To facilitate a clean burnout, B9Creations casting resins must be thoroughly cured in a post-curing unit, such as the B9 Model Cure – which uses UV LED light with wavelengths from 390-410 nm.
Place your printed piece in a small container of water while post-curing – water acts as an oxygen inhibitor, decreasing cure time and increasing  cure penetration. To ensure an even post-cure, it’s important that you remember to rotate your 3D printed part periodically throughout the post-curing process. For desired results using the B9 Model Cure, we recommend curing smaller models for 10 minutes and larger models for 20 minutes.
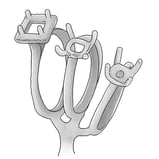
Sprue to Casting Tree
 First, take a minute to imagine how the liquid metal will flow through your castings – pay attention to areas where your pieces go from thick to thin, sprue them from the thickest area to make sure they will fill with liquid metal, and to reduce shrinkage porosity on the piece.
Some expansion will inevitably occur when applying heat – spruing in excess (or over-spruing) will help relieve pressure during this expansion. Sprue your 3D printed resin model onto your tree with wax – wax will burn out quicker and allow room for expansion.
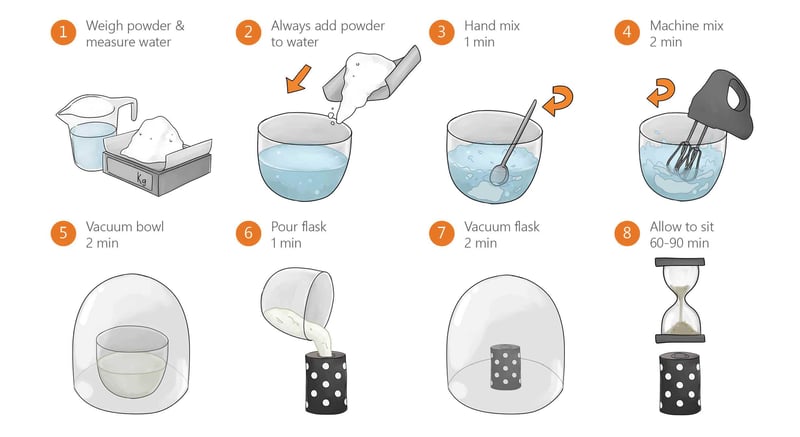
Prepare Investment
For best results, always follow the instructions provided with your chosen investment.
Burnout
If at this point you’ve closely followed each of the preceding steps, our jeweler-approved burnout schedule will produce repeatable, flawless casting results in metals of silver, gold, platinum and more! For best results, be sure to ventilate your oven chamber and follow our recommended burnout schedule below.
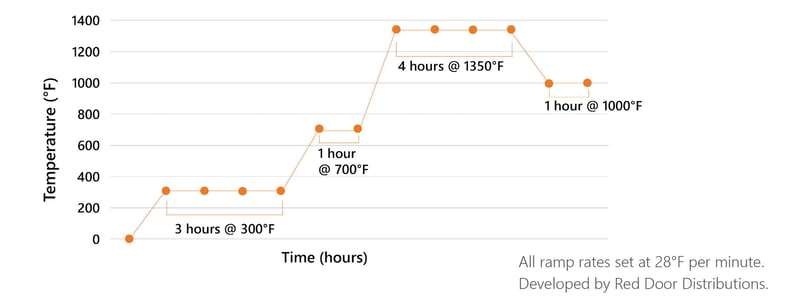
- Place flask into a cold oven.
- Gradually raise oven temperature to 300°F – hold for 3 hours.
- Raise oven temperature to 700°F – hold for 1 hour.
- Raise oven temperature to 1350°F – hold for 4 hours.
- Lower oven temperature to 1000°F – hold for at least 1 hour prior to pouring metal.
Cast
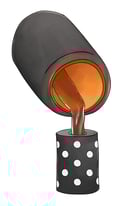 Carefully remove your flask from the oven chamber.
B9Creations Yellow Resin leaves no ash, but this is not guaranteed with other casting resins. If your 3D printed part contains any remaining ash at this stage, vacuum it out of the investment to avoid flaws in your finished piece. Now, the piece is ready to be cast in your desired metal!
Polishing & Finishing
 Once casting is complete, submerge your flask in water to wash away the investment. Use a magnetic tumbler or alternative polishing chamber to refine your completed designs, and perfect your piece with hand finishing.
“The B9Creations resin is essentially just like the casting waxes we have used for decades. There was no real transition from traditional waxes to the resin. This has a huge impact on our return on investment, for the short-term and especially for the long-term. Having an easy casting procedure allows us to focus on other tasks, which lowers my overhead costs per print/cast.” - Javier Odom | Walt’s Jewelers

Recommended Casting Resins:
Emerald Resin provides clean burnout without staining the investment, enables casting of thicker objects, and prints with excellent detail to show the finest features of any design.
Yellow Resin is our premium casting resin with the cleanest burnout that leaves no ash, prints crisp detail, and directly casts in platinum.
FastWax is an easy-to-cast resin that boasts the benefits of wax – without the wait! Reduce your post-processing and polishing with our smoothest resin yet.
Recommended Investments:
- Prestige Optima™
- Ransom & Randolph® Plasticast® PT
- Ransom & Randolph® Ultra-Vest® MAXX


