
Valuable time is set aside for the tedious steps of post-processing your 3D printed part. Additive manufacturing technologies have been advancing over the years to increase printing speed and automation. Advancements in post-processing have been slower — especially when it comes to cleaning. A disrupted workflow causes delays in your final print. Post-processing can look different depending on your object printed, resin used, and the intended use of the print. Having efficiencies in a couple steps does not mean you have an optimized workflow. We will go over a few crucial steps in post-processing and their best practices.
Support Techniques and Removal
Supports are added to a design to assure sections are printed properly. For successful prints, supports hold up overhangs as well as make sure the print is adhered to the build table. Much like a building, prints require supports under large surface areas that can be prone to suction or sinking.
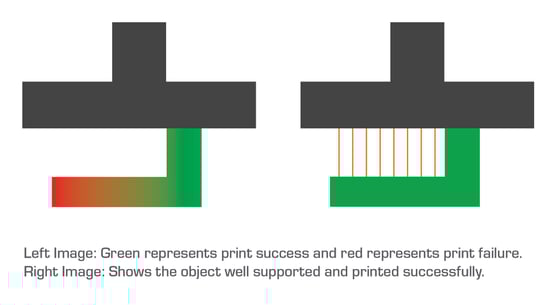
The amount of supports in your design can affect the amount of time needed for post processing. Each support requires manual removal to reveal the printed object. The less supports you have, the less time consuming post processing is. There are a couple ways to optimize your print before your design is even sent to the printer.
1. Design Orientation
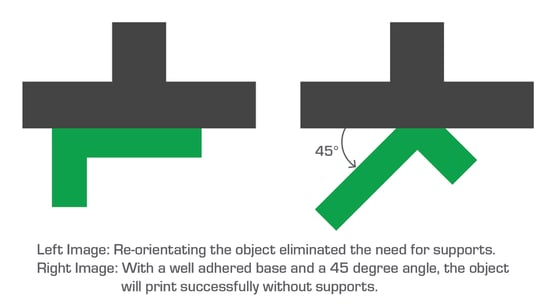
Proper orientation of your print is the most effective way to reduce post-processing. The best way to accomplish this is to adjust your design so overhangs are not parallel to the build table. If the overhang prints at a 30 - 45 degree angle you will only need a support at the beginning — the rest will build off of itself. Orientating your design this way will also decrease the height of your print which then increases your printing speed for DLP 3D printing technologies.
2. Types of Supports
Most 3D printing support software will allow you to adjust the size of your support. Using larger supports will decrease the amount needed. However, when removed, larger supports show more scaring on your final print. Smaller supports require more to be used but will show little to no scaring and can be placed strategically in small spaces.
Supports can be removed before the curing stage of your post-processing workflow. During this time, the print is softer and easier to manipulate. They can be smoothly taken off with a pair of clippers or tweezers.
Support and slicing software like the B9Create software has different size supports and includes custom options for the user to find the best support for their model.
Streamlined 3D Printing Processes
DLP and SLA 3D printing requires a vat that is filled with photopolymer material.
Having more than one vat available, like our DuraVat, allows you to allocate a specific vat for a specific material. With this technique, your most utilized material can always be available and ready for printing without the added steps of cleaning a vat and re-pouring a new material.
Cleaning Your Print
One of the most tedious processes in your workflow is post-printing cleaning. Your print is covered in a layer of uncured liquid resin that needs to be removed before you can proceed. Cleaning can be done using several different methods.
1. Manual Cleaning
With manual cleaning you place your print in a container filled with cleaning solution, manually stir or shake the part around and rinse it. The most effective cleaning solution used is isopropyl alcohol (IPA). There are internal crevasses with more complex prints that cannot be seen or reached through manual cleaning. Manual cleaning also creates the risk of damaging your print and exposing your skin to toxic material.
2. Ultrasonic Bath
An ultrasonic bath is a machine that soaks your print in a bath of water while gas bubbles are used to 'scrub' the print clean. After multiple ten-minute cycles, your print comes out with a cleaner finish. Every time new water is put into the ultrasonic bath, the machine needs to be degassed.
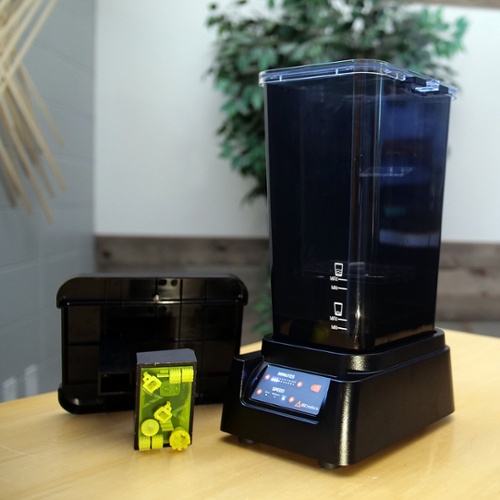
3. Automated Cleaning Unit
The easiest and safest way to clean your print is with an automated cleaning unit. Our B9Clean requires limited contact with uncured resin and IPA. Your print is taken directly from the printer, while still on the build table, and placed in the clean unit. Pieces printed on a third-party build table can go onto a part tray and then placed in the cleaning container.
With several different time and speed cycle options, the B9Clean lets you press a button and continue with your workflow. The cleaning solution is stirred by a small agitator at the bottom of the unit, which even reverses direction every minute for optimal cleaning. While your part is being cleaned in IPA, the excess liquid resin dissolves. The soft movement cleans the hard-to-reach areas and takes off the final layer of unwanted resin without the threat of damaging intricate prints. When the cleaning is done, the IPA drains out of the container and the print starts to air-dry — ensuring parts never oversoak in IPA.
Below is a quote explaining how one of our customer manually washes his print and his excitement to integrate the B9Clean.
“Before I had the B9Clean, I had to do an alcohol pre-rinse, then transfer to a new jar of alcohol I submerge in an ultrasonic, then rinse, then cure. This will save me tons of time and fits right in to my plan of automation in the workshop.”
- Paul Stoll | Goldfinger Jewelry
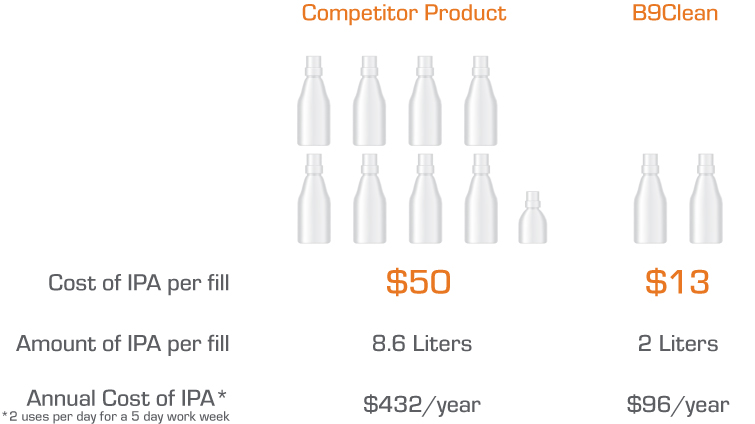
Cost of IPA
Other 3D printing automated cleaning units use a considerable amount of IPA — in some cases up to 8.5 liters, which costs approximately $50. The B9Clean has two fill levels holding 1.3 liters for smaller prints and up to 2 liters for larger prints, which costs around $8-$13. Each fill of IPA in the B9Clean can be used up to 50 times. The versatility allows the B9Clean to use 75% less cleaning solution than other units which saves you money in the long run. Not only is using less IPA more cost effective, but there is also four times less dirty IPA that needs to be cautiously disposed of.
B9Creations additionally offers an option to purchase the cleaning container individually. Having two containers, much like having two vats, allows you to take the process one streamlined step further, using one container for an initial rinse and having a second container with fresh IPA. Instead of disposing of the used IPA, you can keep it in one container and add fresh IPA to your other container. Reducing the waste of IPA reduces your overall post processing cost.
"For me, it's all about workflow. It's the same reason I bought the B9 Core 550. When I began looking seriously at how much time I was wasting playing around with 3D printing, it made me realize I've already lost what I've spent on the printer and wash unit, hands down. I'll give you an example, I just took on two new contracts, both with $5,000 deposits all because of the amount of time I've freed up with your products. No joke, no exaggeration, just more selling opportunities available to me now."
- Kevin Fertenbaugh | Kevs Jewelry Designs
Curing Your Print 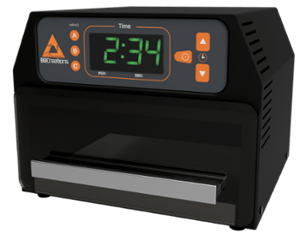
The final step of post-processing is curing. Most materials require curing to reach their desired properties and strength. Curing can be achieved through methods using varying combinations of light and heat. The B9 Model Cure uses UV LED light with wavelengths from 390-410 nm. Features like the slide out drawer, timer, completion alarm, and memory settings enable fast, precise, repeatable workflow.
If there was any excess resin that was not previously cleaned off, it has now hardened onto your print. Therefore, a proper clean is crucial.
Final Product
Once your supports are be removed, your print is cleaned and cured, your part is ready to go! Integrating the end-to-end solution that enables your business to operate more efficiently and profitably than ever before.
"We listened to our customers and they told us they wanted a way to eliminate the manual part of the cleaning process. Something where they didn't have to put on gloves and deal with the time and hassle of cleaning off their parts. It's really about workflow and the value of your time."
- Michael Joyce | Founder & CTO of B9Creations
Please note, handling resin can be hazardous and direct contact should be avoided.


