Pre-printing Set Up
To begin using the B9Creations ecosystem of additive manufacturing products, upload an existing .stl file of the print into the B9Create software. For assistance using the B9Create software please go to the B9Create Usability Guide.
Printing
Before initiating the printing process the printer must be prepared properly. Ensure that the build table, resin vat window, and printer light engine window are all clear of debris and any remaining resin. Securely fasten the build table to the z-axis arm and fill the printer vat with the resin selected in the Create software. Having excess resin in the vat will not cause any complication unless it exceeds the maximum fill line. For an estimate of how much resin is actually needed, the file will display an approximate print volume on the Prepare for Printing screen of your B9Creations printer.
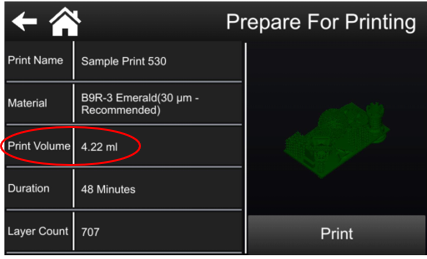
It is always better to ere on the side of caution, as this is just the approximate amount of resin needed to complete the printing process. When selecting the print, several different z height resolutions can be chosen. Each of these resolutions will change how thick each slice is. The thinner the slice the better the resolution, but the longer it will take to print the part. Finding the correct balance between speed and resolution is application dependent. Therefore it is not possible to provide a general guidance.
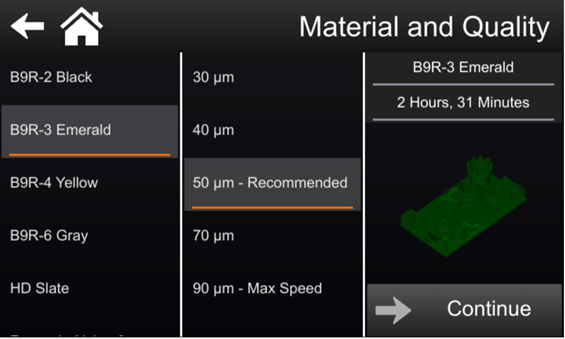
After the z height resolution has been selected, simply press begin printing and the printer will produce the part.
If the printer experiences an error during the printing process, or if the part did not turn out as expected a troubleshooting guide can be found here.
Post Printing Process
Once the print has completed the post processing can begin. While handling liquid resin gloves must always be worn. If another print is not planned to begin immediately it is best to remove the vat from the printer, cover the vat with the provided cover, and if using a DuraVat recharge before the next use. Information about printer cleaning and maintenance can be found here.
Cleaning
Residue will remain on the part after the printing has been completed. To remove the residue the finished part must be washed with isopropyl alcohol. It is best to do this with a B9Model Clean unit. Regardless of the method of cleaning ensure that the part has been completely dried and free of isopropyl alcohol before progressing to the next step. If the part is not dried thoroughly before progressing to the next step, serious damage both structural and physical can occur. For further direction on cleaning the printed component please visit the B9Model Clean Operations Guide.
Curing
The final step of the printing process is curing the part. This must be done in a B9Model Cure, as other UV emitters are not optimized for curing photopolymer resins. While technically possible if a UV emitter is used to cure parts fabricated on a B9Creations machine and an error is encountered it will not be possible for B9Creations support team to assist in the troubleshooting process. Each resin in the B9Creations catalogue has unique curing intensity specifications and curing durations information about curing specific resins can be found here. For further direction on cleaning the printed component please visit the B9Model Cure Operations Guide.