Operation and tooling suggestions for B9 Elite Micro 3D Printer
Part Design:
Minimum internal and external features will vary depending on the orientation of the part, handling, and cleaning. Minimum feasible feature sizes are suggested below and are based on a square cross section.
It should be noted that external features are referring to excessive consistent features.
| Material |
Min Ext XY Feature Size (μm) |
Min Int XY Feature Size (μm) | Min Int Z Feature size |
| HD Slate | 60 | 180 | 100 |
| HD Clear | 30 | 150 | 200 (barely), else 400 |
| ABS/PC | 80 | 180 | 150-200 |
Part CAM:
Ensure that large overhangs are supported
Any overhangs larger than 2mm are considered “Large”
B9Create 3.0 allows supports of up to 0.1mm in diameter. These are viable for supporting micro parts. These supports should not be angled more than 45 degrees for greatest chance of success.
Part Handling:
It is recommended that parts be cleaned immediately after printing without disturbing or removing the part from the build table.
Cleaning should be performed in a B9Clean unit for 10 minutes on the slow preset.
Additional cleaning in an ultrasonic cleaner may be needed depending on part geometry.
Thin walls (less than 150 um) are subject to deformity so it is recommended to handle with extreme care.
HD Slate parts in the green (pre-B9Cure XL) state are very pliable and should be handled with care.
Enclosed Fluidic parts may need to be flushed with IPA to clean. It is recommended to design your part with a fixture that provides an interference fit to a syringe with a metal tip
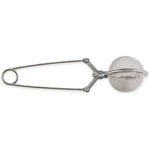
Drying with low pressure air is recommended. To avoid accidentally blowing parts away, a tool such as a mesh tea ball spoon is recommended To clean specific internal features, it is recommended to wash the part with a syringe and syringe tip.
Let the part completely dry before curing.
Visually inspect all parts for excess resin after washing and before curing.
Best Curing and Support Removal Practices by Material:
HD Slate:
It is recommended to cure parts before removing support material due to the softness of the material in the green state. This may be done on the build table if part cleanliness can be assured. This may be avoided for thick or rigid parts but is highly recommended for small parts that can be easily deformed.
If extremely small parts are removed from the build table prior to cure it may be beneficial to pour out the water through a mesh filter to collect the parts.
HD Slate should be cured in water for 10 minutes each side in a B9 Model XL Cure Unit
HD Clear supports are very stiff in the green state and can be removed before curing. HD Clear should be cured in water for 15 seconds each side in a B9 Model XL Cure Unit. Excessive cure time can lead to part discoloration.
ABS/PC supports are very stiff in the green state and can be removed before curing. After ABS/PC is cleaned, it is recommended to let the part completely dry to prevent scarring. ABS/PC should be cured in air for 10 minutes each side in a B9 Model XL Cure without water.
Elite Micro Tooling Suggestions:
Elite Micro Tooling Suggestions:
|
Necessary for curing HD Clear Material |
|
Initial Cleaning of parts |
|
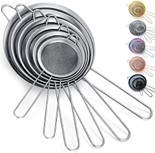
For better cleaning of parts |
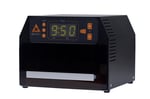 B9 Model XL Cure Unit
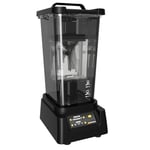 B9 Clean
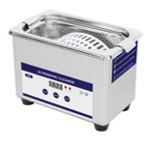 Ultrasonic Cleaner
|
Mesh Tea Ball Spoon &/or small mesh flour sifter Allows for contained cleaning of small parts without concerns of loosing parts due to compressed air
|
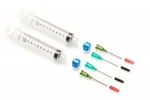 Assorted syringe and tips for more precise cleaning of parts, such as self-enclosed microfluidics or negative features Assorted syringe and tips for more precise cleaning of parts, such as self-enclosed microfluidics or negative features |
|
Mesh filter: Good for separating parts from cure container water + Resin cleaning Tweezers: essential for handling parts. These metal ones work well. Spray bottle: necessary for broad strokes cleaning Razor Blades: Good for precise removal of parts from the build table. Use care not to scratch/gouge the build table. |
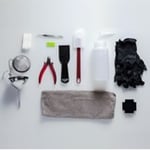 B9C Finishing kit